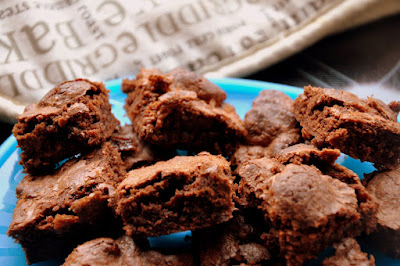
Originally, we had thought we had found our perfect brownies with this recipe. Recently, however, after we decided to make the brownies without the ganache topping, we found that it was rather... blah. Don't get me wrong, with the topping, the brownies are delicious. But sometimes, you feel a craving for something ... plain and chocolatey, without any fanciful toppings and sprinkles. Not that the sprinkles are bad or anything. ;)
Luckily, we had recently come across one of Ibu's old Periplus Mini Cookbooks... you know, those small cookbooks they sell for about $5. :) Ibu has quite a collection of those. One of them was titled "Brownies, Fudges and Toppings". For some reason, we hadn't flicked through it recently, and my... what a treasure we found! All sorts of delectable brownies. :) I had made one batch, but that didn't survive the photo-taking before it was all eaten up, haha. Since we were out of ingredients for that one, we decided to make these... Honeycomb Brownies. Here we go!
What you need:
100g chocolate-coated honeycomb bars
125g butter
185g dark chocolate, chopped
2 eggs
1 cup caster sugar
2 teaspoons vanilla essence
1 cup plain flour, sifted
What you do:
- Preheat the oven to 180 C. Lightly oil an 8-inch square baking tin. (We used a 10-inch tin). Line the base with baking paper, extending over 2 sides.
- Roughly chop the honeycomb bars. Set aside.
- Melt the chocolate and butter together and allow to cool slightly. Transfer the mixture into a medium bowl. Whisk in the eggs, caster sugar and vanilla essence.
- Add in the sifted flour and stir until well-incorporated. Fold the chopped honeycomb through the mixture.
- Pour into the prepared tin, pushing any exposed honeycomb into the mixture, and smooth the surface.
- Bake for 35 minutes, or until firm. (We baked for 25 minutes) Allow to cool in the tin before cutting into small squares to serve. Refrigerate in an airtight container for up to 1 week.
Mmmmm! We had happened to have some Crunchie bars around, so this was a good choice. Of course, I had to stop various people from scoffing it down while it was lying around chopped, but we made it in the end! This time, I made sure to take pictures straight out of the oven before anyone was around. And even then, one of my brothers was bugging me about it as the delicious chocolatey smell had permeated through the house. (We haven't been baking in awhile, see... He's been bugging us about cookies too. Kasian.)
Anyway, the reason we decided to use a 10-inch pan instead of an 8-inch one was because we wanted a thinner brownie. Might not have been a good idea in the end, as the honeycomb was all melted, leaving little mounds on the surface of the brownie, reminescent of the moon's surface actually (or a volcano), but it still tasted alright. Really really good, in fact. the texture was sort of... chewy fudge with a hint of gooey-ness from the melted honeycomb. And if the reaction we got from it was anything to go by, it was a resounding success! :)
Ibu took one slice before cooking dinner and looked to have another square as dessert, but alas! The boys had already wolfed it down. Oh, the boys plus Izzah, who had it warmed with ice cream. yum! The only person who didn't quite like it was Babah, who said that he liked cakes and biscuits, but not so much brownes which seem to be a cross between those two. Haha. But that's precisely why I love brownies!
Speaking of texture, the edges of this one were extra crunchy, probably because of the thinner brownie, but I thought I should mention it. Just in case. I think next time, I will stick with an 8-inch pan for this one. Hopefully, the honeycomb pieces will be left intact then. But make sure you use a deep pan. Otherwise, the whole thing might just spill over during the baking. Look out for more brownie recipes in the coming weeks. )
Quote of the day: What is the meaning of life? All evidence to date suggests it's chocolate.
Recipe from Ihsan


0 comments:
Post a Comment